Courses: Introduction to GoldSim:
Unit 17 - Creating Dashboards and Player Files
Lesson 10 - Advanced Dashboard Options
By now you should be somewhat comfortable with the basics of creating and using Dashboards.
In this Lesson, we are going to briefly discuss two advanced Dashboard options that can be used to add to the power and flexibility of your Dashboards.
Let’s start by opening the file Example39_Hiding_Controls.gsm. You will find it in the “Examples” subfolder of the “Basic GoldSim Course” folder you should have downloaded and unzipped to your Desktop.
This is a very simple (static) model, where the user enters a density, and then either a volume or a mass. If the user enters a volume, the corresponding mass is computed. If the user enters a mass, the corresponding volume is computed. The logic for doing this is carried out using two Selectors:
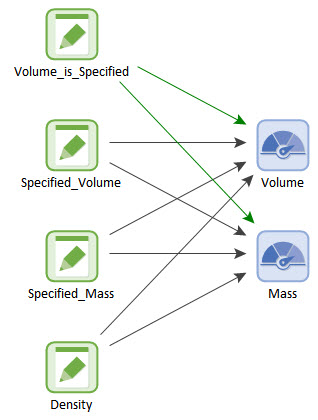
Take a quick look at the logic to make sure you understand it (it is straightforward).
Now enter the Dashboard:
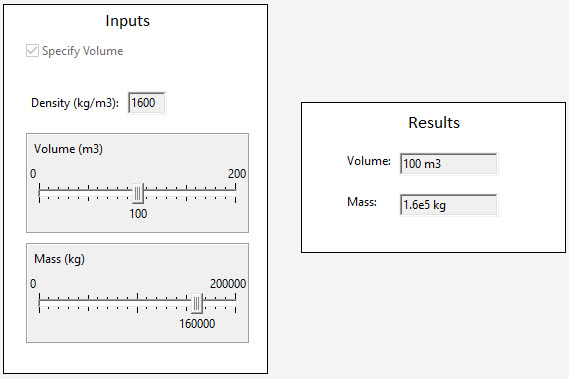
You will see that there is a Check Box control that is used to specify whether volume or mass is specified. In all cases, the Density needs to be entered. However, depending on the state of the Check Box, only one of the other two inputs (Volume or Mass) is required. In particular, if the box is checked, we want to enter a Volume (but not a Mass). If the box is cleared, we want to enter a Mass (but not a Volume).
GoldSim provides a convenient way to enforce this. Double-click on the Volume Slider, and go to the Attributes tab:
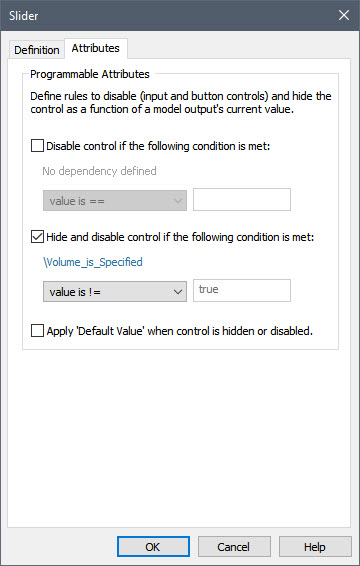
As can be seen, this tab allows you to hide the control when a certain condition is met (in this case, if the box is cleared). If you look at the Attributes tab for the other Slider, you will see similar (and complementary) logic.
Now place the Dashboard in Active view. You will see that depending on the state of the Check Box, only one of the Sliders is shown:
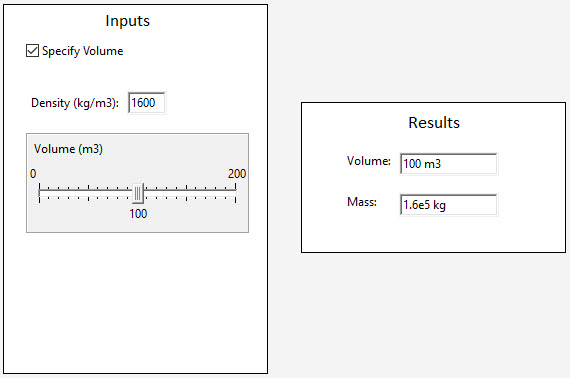
All controls have an Attributes tab. This simple example illustrates how you can use that tab to make your Dashboards more logical and easier to use.
The second advanced Dashboard feature that we are going to briefly introduce is the Scenario control.
In Unit 15, we discussed GoldSim’s scenario modeling features. We learned in that Unit that GoldSim’s scenario modeling capability allows you to directly compare results generated by your model using different sets of input parameters. In effect, when you use this capability, your model can store (and subsequently compare) multiple sets of inputs and outputs.
Within GoldSim, you can create, edit and run scenarios using specialized dialogs and features within the GoldSim interface (e.g., the Scenario Manager). But how do you do these things via a Dashboard (e.g., in a Player file)? To support this, GoldSim provides a specialized Scenario control. The button in the Dashboard Tools toolbar for inserting it looks like this:

The Scenario control looks like this when it is first added to a Dashboard:

It allows the Dashboard user to: 1) select and edit the Active Scenario, 2) run the scenario; 3) view the Scenario Data table, and 4) add and delete scenarios. You can control which features are available by double-clicking on the control:
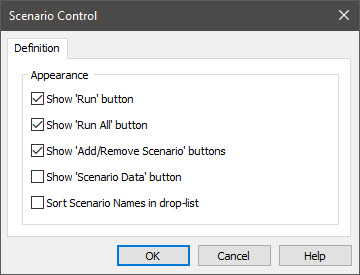
To illustrate its basic features, we will examine a simple example model. In particular, we are going to look at a version of Exercise 23 (which we worked on in Unit 15, Lesson 9). That model was intended to illustrate GoldSim’s scenario modeling capabilities. Open the file Example40_Scenario_Control.gsm. You will find it in the “Examples” subfolder of the “Basic GoldSim Course” folder you should have downloaded and unzipped to your Desktop.
The model looks like this:
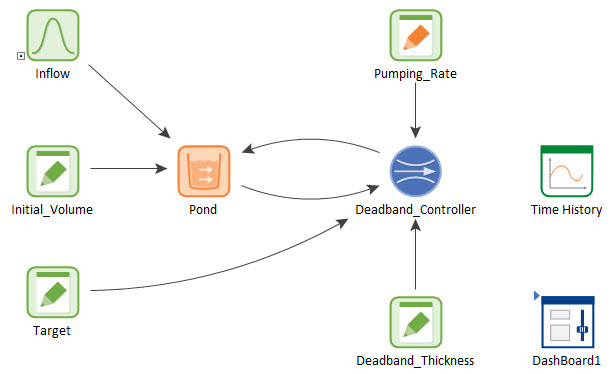
The model had three scenarios and a single Scenario Data element. The only change you will see from Exercise 23 is that a Dashboard (with a Scenario control) has been added.
Now enter the Dashboard:
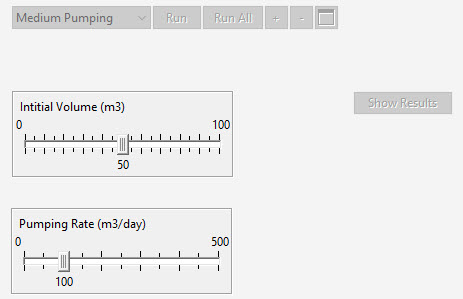
This is a very simple Dashboard with the following four components:
- A Slider control for the Initial Volume. It is important to note that this input DOES NOT differ between scenarios (i.e., it is not linked to a Scenario Data element).
- A Slider control for the Pumping Rate. This input DOES differ between scenarios (i.e., it is linked to a Scenario Data element). In fact, it is the only input that differs between scenarios (i.e., it is the only Scenario Data element)
- A Button control that displays the Time History Result.
- A Scenario control.
Now place the Dashboard in Active view. You will see that the Scenario control provides a drop-list with all of the defined scenarios:

If you toggle between the scenarios, you will see that the value for the Pumping Rate changes. In fact, you can modify it for any scenario if you want. You can also display the Scenario Data table (showing the different values for all scenarios) by pressing the button on the far right side of the control):

Note that you can view the data here, but you cannot edit it.
Close this window and return to the Dashboard. Note that you can change the Initial Volume, but you will notice that it does not change when you change the scenario (since it is the same for all scenarios).
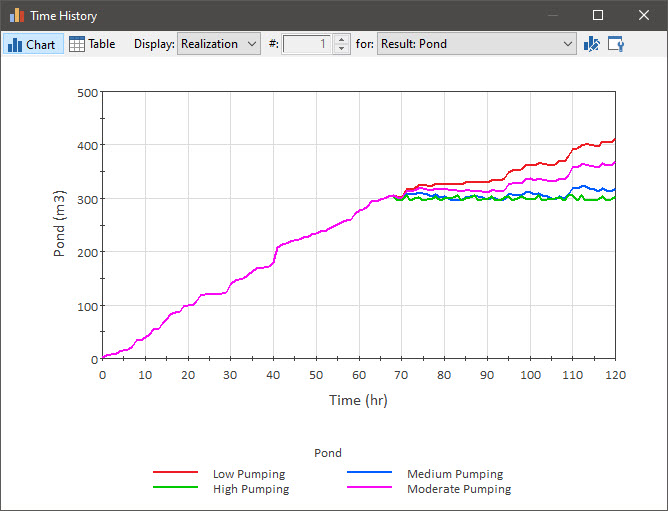
Press Run All, and GoldSim will run all three scenarios. You can then press the Show Results button to display the time history results for the three scenarios:

Close the result chart. Next we are going to use the Scenario control to create a new scenario. In the Scenario control, press the plus sign (+). When you do so, you will be prompted with a dialog to create a new scenario. Give it an ID (Moderate Pumping), and (optionally) a short description. Then press OK. The Scenario control will now look like this:

Now go to the Pumping Rate Slider and change it to 70 m3/day. Note that in addition to moving the slider itself, if you right-click on the vertical slider bar, it will pop up a window that allows you to type in a value:

Enter a value of 70 and press Enter on your keyboard.
You have now defined the value of the Pumping Rate for this new scenario. The other scenarios have already been run, but this one has not, so run it now by pressing the Run button in the Scenario control (just to the right of the scenario name). Then press the Show Results button again. You will see that there are now four scenarios to view:
Note: If you do not want to allow the Dashboard user to add (or remove) scenarios, you can hide the + and - buttons on the control.
This is a rather complex control, and we have only touched on its use here. However, it should be enough for you to get started using it. You are encouraged to read more about this control in GoldSim Help.
