Courses: Introduction to GoldSim:
Unit 13 - Probabilistic Simulation: Part II
Lesson 7 - Understanding Random Numbers and Sampling
Now that we have discussed how you can use GoldSim to represent a stochastic process and have covered all of the basics of probabilistic simulation, we will spend the remainder of this Unit discussing several advanced probabilistic modeling topics.
As part of this, we will discuss some of the other options in the Monte Carlo tab of the Simulation Settings dialog. We will begin by first discussing in this Lesson the details of how a Monte Carlo simulation is actually carried out. This is one of those “theoretical” topics that is not “hands-on”, but is important to understand in order to properly carry out probabilistic simulations. That is, if you are going to use Monte Carlo simulation (or any other advanced algorithm), you should understand conceptually how it actually works and should not treat it as a “black box”.
Recall from the previous Unit that we briefly summarized what GoldSim does when we run a Monte Carlo simulation. In simple terms, it can be summarized as follows:
- For realization #1, it randomly picks a value for each element that represents uncertainty (e.g., Stochastics, as well as other elements such as a randomly time-shifted Time Series). This is referred to as sampling the element.
- After sampling each element, it carries out the calculations for the model. Some elements (e.g., resampled Stochastics) may actually be sampled multiple times during a single realization.
- The results for that realization are saved.
- Steps #1 through #3 are then repeated for all realizations.
- At the end of the simulation, GoldSim has a set of n results (where n is the number of realizations). These results can be assembled into probability distributions (in the same way that a frequency distribution can be created by tabulating and sorting multiple observations).
Let’s describe step #1 in a bit more detail, and more importantly, discuss how you can influence how it is carried out.
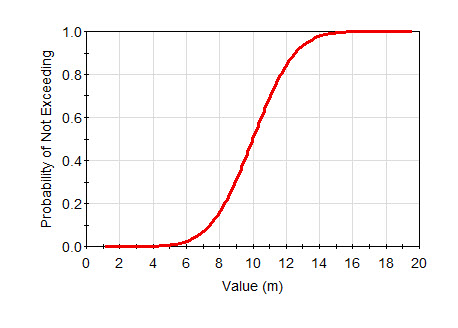
In order to sample an element (several types of elements can be "sampled", but we will simplify the discussion here by using a Stochastic element as an example), GoldSim starts with the CDF of the distribution that we want to sample. Below is a CDF for a Normal distribution with a mean of 10 m and a standard deviation of 2 m:

To randomly sample this distribution, we need to do the following:
- Obtain a random number (i.e., a number between 0 and 1).
- Use the CDF to map that random number to the corresponding sampled value.
So, for example, in the CDF above, a random number of about 0.2 would correspond to a sampled value of about 8.3m.
As can be seen, this sampling process itself is actually conceptually very simple. The more complicated part involves obtaining the random number needed to sample the element. That is, in order to carry out Monte Carlo simulation, GoldSim (and any Monte Carlo simulator) needs to consistently generate a series of random numbers. How does it do that?
The details of this are very complex (and the process is done slightly differently by different tools), but conceptually the process is actually not that difficult to understand. The process used in GoldSim is described in detail in Appendix B of the GoldSim User’s Guide.
For the purposes of this discussion (how you can affect the sampling process), in very simplified terms, the process consists of the following components:
- Several different types of random number seeds. You can simply think of a random number seed as a number (technically, it actually consists of a pair of integers, but that is not important to the discussion that follows).
- Random numbers. A random number, as used here, has a specific definition: it is a real number between 0 and 1.
- A random number generator. This is an algorithm. It takes as input a random number seed and generates a random number. A particular value for the random number seed always generates the same random number, but different random number seeds generate different random numbers.
Within GoldSim, there are several types of random number seeds. The three types that are of interest for this simplified discussion are as follows:
- The run seed is created based on an integer number that can be edited by the user in the Simulation Settings dialog.
- Each Stochastic element (as well as other elements that behave probabilistically) has its own random number seed. This is referred to as the element seed. This seed is created (in a random manner, based on the system clock) when the element is first created.
- Throughout the simulation, GoldSim uses an algorithm to generate what we will refer to here as a combined random number seed whenever it needs to sample an element (i.e., every time it needs to sample an element, a new combined random number seed is generated). The combined random number seed is used to generate a random number (using a random number generator), which in turn can be used to sample the element.
The key point is that the combined random number seeds that are generated are solely a function of the run seed and the element seed. If the run seed and element seeds are the same, the same combined random number seeds will be generated. If they are different, different combined random number seeds will be generated.
Given this information, you will now be able to understand why different simulations may give different answers and how you can control the manner in which GoldSim carries out its random sampling by using options on the Monte Carlo tab of the Simulation Settings dialog.
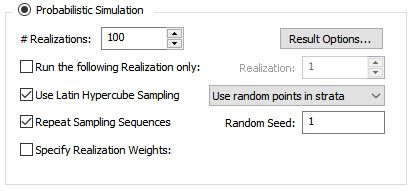
Let’s turn to that now. Open up GoldSim, go to the Simulation Settings dialog, and select the Monte Carlo tab. The top portion of the dialog looks like this:

For now, we are going to focus on just two fields: Repeat Sampling Sequences and Random Seed. These two fields impact the run seed in the following ways:
- If Repeat Sampling Sequences is checked, you can specify a Random Seed. The Random Seed is used to create the run seed.
- If Repeat Sampling Sequences is cleared, the run seed is created “on the fly” using the system clock. As a result, it is different every time the model is run.
These facts can be used to describe exactly how elements will be sampled in various models under any set of circumstances. In particular:
- If Repeat Sampling Sequences is checked (the default), as long as you do not modify the model or the Random Seed, you will get the same results (i.e., the same random numbers will be used) if you run the model today, and then run it again tomorrow. This is because the run seed is unchanged.
- Similarly, if Repeat Sampling Sequences is checked and you copy a model to someone else (and they do not make any changes), they will get the same results as you.
- If Repeat Sampling Sequences is checked, but the Random Seed is changed (e.g., from 1 to 2), you will get different results (i.e., different random numbers will be used). This is because the run seed is different. If you then change the Random Seed back to the original value, you will reproduce the original results.
- If Repeat Sampling Sequences is cleared, every time you run the model you will get different results (i.e., different random numbers will be used). This is because the run seed is different.
- If two people simultaneously build the same simple model (e.g., the dice model we discussed in the previous Unit) with the exact same inputs (including the same Random Seed), the results will still be different (i.e., different random numbers will be used). This is because the element seeds will be different between the two models. This, by the way, is why on several previous occasions when we were building models we mentioned that your results would differ from the results shown.
As a general rule, you should keep Repeat Sampling Sequences checked (the default). Otherwise, as you develop (and test) your model, it will be impossible to determine if changes in behavior are due to changes you have made to the model or simply due to random sampling differences (we will discuss how to develop and test probabilistic models in more detail at the end of this Unit).
With regard to models that you are editing, there are three additional points to understand:
- Adding additional Stochastic elements has no impact on the random numbers generated for other Stochastic elements in the model. That is, the random numbers for each Stochastic are independent of the random numbers for the other Stochastics (unless you have correlated them). This is because the element seeds are independent of each other.
- If you copy (Ctrl+C) and paste (Ctrl+V) a Stochastic, the elements are identical in every way except that they have different element seeds (i.e., a new element seed is created during the paste operation). Otherwise, the two elements would be perfectly correlated!
- You can move an element between Containers in a model (by right-clicking on it and selecting Move To…). Unlike copying and pasting and element, moving a Stochastic element does not change the element seed.
Before we leave this Lesson, let’s discuss one additional option on the Monte Carlo tab: Use Latin Hypercube Sampling. This is a particular type of sampling method that causes probability distributions to be divided into a number of equally likely “strata”. This has the effect of ensuring that the parameter is uniformly sampled over probability space. To understand how this is done, let’s refer back to the CDF we referred to at the beginning of this discussion:

How GoldSim samples the distribution using Latin Hypercube Sampling (LHS) is a function of the number of realizations. Let’s assume that you ran 5 realizations. In this case, GoldSim would ensure that one sample was selected from the 0 to 0.2 cumulative probability range, one from the 0.2 to 0.4 cumulative probability range, and so on (which range is sampled in each of the 5 realizations would be random). This ensures that sampling is “spread out”. If LHS was turned off, it is possible, for example, that none of the five realizations would fall in the 0 to 0.2 or 0.8 to 1 cumulative probability range (in fact, it is possible, but not likely, that all five could fall closely together). Conceptually, LHS accounts for where other samples have been previously drawn from when selecting the next random number.
As a general rule, LHS tends to have a significant benefit only for models involving a small number of uncertain variables and a low number of realizations. As either of these increase, its impact is diminished. However, under no circumstances does it perform worse than true random sampling, so by default, it is turned on.
One impact of LHS that you should be aware of, however, is that the values sampled for any particular realization are a function of the total number of realizations (since this determines the size of the LHS strata). That is, if LHS is on, the sampled values for realization #1 will change if you carry out 10 realizations instead of 100 realizations. On the other hand, if LHS is off (and Repeat Sampling Sequences is on), the sampled values for any given realization will be identical regardless of the number of realizations you carry out.
If you are interested, you can read about the computational details of how LHS is carried out in Appendix B of the GoldSim User’s Guide.
